Necklace layering has evolved from a styling afterthought into a sophisticated art form that defines contemporary jewellery expression. The practice of combining multiple chains, pendants, and textures at varying lengths creates dimensional interest that transforms even the simplest outfit into a statement of personal style. Yet achieving this effortlessly chic look requires more than randomly selecting favourite pieces—it demands an understanding of proportion, metal compatibility, and strategic placement that prevents the dreaded tangled mess whilst maximising visual impact.
The appeal of layered necklaces lies in their versatility and capacity for personalisation. Whether you gravitate towards minimalist two-chain combinations or maximalist editorial stacks featuring five or more pieces, the fundamental principles remain consistent: variation in length creates separation, textural contrast adds depth, and thoughtful focal point placement guides the eye. As you master these foundational concepts, you’ll discover endless possibilities for expressing your aesthetic through combinations that feel uniquely yours.
Understanding necklace lengths and their proportional relationships
The architecture of successful necklace layering begins with comprehending standard chain lengths and how they interact when worn together. Each length designation corresponds to where a necklace naturally falls on the body, creating invisible zones that determine spacing between layers. This mathematical relationship between lengths forms the backbone of balanced stacking—when you understand these proportions, you can predict exactly how pieces will sit before fastening a single clasp.
Choker to collar length: 14-16 inch chains as foundation pieces
Choker-length necklaces measuring 14 to 16 inches sit snugly at the base of the neck, creating the uppermost layer in most stacking configurations. These foundation pieces establish the starting point from which all other layers cascade downward. A 14-inch choker sits higher and tighter, ideal for those with longer necks or when you want maximum definition between your shortest and next layer. The 16-inch variation provides slightly more breathing room whilst still maintaining that close-to-neck placement that defines this category.
When selecting choker-length pieces as your foundation, consider both comfort and visual weight. Delicate chain styles work beautifully for everyday wear, whilst textured or wider chokers make bolder statements. Many jewellery enthusiasts find that starting with a simple 16-inch chain in their preferred metal creates the most versatile base—refined enough not to compete with statement pieces below, yet substantial enough to register as a deliberate layer rather than disappearing entirely.
Princess length necklaces: the 18-inch standard for Mid-Layer placement
Princess-length necklaces at 18 inches represent the most universally flattering dimension in jewellery design, resting gracefully at the collarbone. This length serves as the workhorse of layered looks, functioning equally well as a standalone piece or as the middle tier in three-chain configurations. The collarbone placement creates natural visual interest by interacting with your body’s contours, particularly when you incorporate pendants that catch light as you move.
The 18-inch standard offers remarkable versatility across neckline styles and occasions. It sits below the neck’s curve but above the décolletage, occupying what professional stylists often call the “safe zone”—close enough to frame your face, distant enough to work with most clothing cuts. When building your layering collection, investing in quality 18-inch chains in various textures provides the structural middle ground that anchors shorter chokers above and longer chains below.
Matinee and opera lengths: 20-30 inch chains for dimensional depth
Matinee lengths spanning 20 to 24 inches and opera lengths from 26 to 30 inches introduce dramatic vertical dimension to your layering architecture. These longer chains fall below the collarbone—matinee lengths typically reaching the top of the bust, whilst opera lengths extend to mid-bust or lower. This substantial length differential creates the visual “breathing room” that prevents your stack from looking compressed or cluttered.
Longer chains naturally draw the eye downward, creating an elongating effect that flatters most body types. They also provide ideal real estate for statement pend
pendants, engraved medallions, and symbolic charms that act as visual anchors for the entire necklace layering composition. When you are working with matinee and opera lengths, aim for at least a 2–4 inch gap from your mid-layer to avoid overlap that leads to tangling. These longer chains are also excellent candidates for adjustable extender chains, allowing you to fine-tune where each layer lands depending on the neckline of your clothing. For many people, a single matinee or opera chain paired with one shorter piece offers enough depth for a refined, everyday layered look.
Because matinee and opera lengths occupy more space across the torso, they are particularly effective for balancing proportion in outfits that feature high necklines, structured blazers, or knitwear. You can treat them much like the vertical line in tailoring: they break up solid colour blocks, draw the gaze downward, and create an illusion of length. If you tend to wear a lot of minimalist basics—plain tees, crew-neck jumpers, or simple shift dresses—an elegant 24–28 inch chain with a considered pendant can quickly become the hero of your necklace layering wardrobe.
Rope length necklaces: 32+ inch statement pieces for maximum layering
Rope length necklaces, typically measuring 32 inches and beyond, are the most dramatic tools in your layering arsenal. These extended chains often fall below the bust or even toward the waist, introducing an elongated vertical line that can completely reframe your silhouette. Because of their generous length, rope necklaces offer exceptional flexibility: you can wear them as a single strand, double them into a choker-and-matinee combination, or even knot them for a lariat-inspired effect.
In the context of layered necklaces, rope lengths work best when used sparingly as statement elements rather than simply another chain in the stack. Their scale means they naturally command attention, so consider keeping upper layers more streamlined to allow the rope to function as a clear focal point. You can also use rope-length pieces to reinforce a specific style narrative—think long, slender chains with minimalist bars for a sleek contemporary look, or beaded strands with organic shapes for a more bohemian aesthetic.
Because rope necklaces sit close to areas of frequent movement—your waist and mid-torso—they experience more friction against clothing than shorter chains. Opting for durable materials and well-finished links becomes particularly important if you plan to wear them regularly. When styled thoughtfully, a single rope-length chain can transform an otherwise simple set of layers into a visually striking, fashion-forward necklace layering statement.
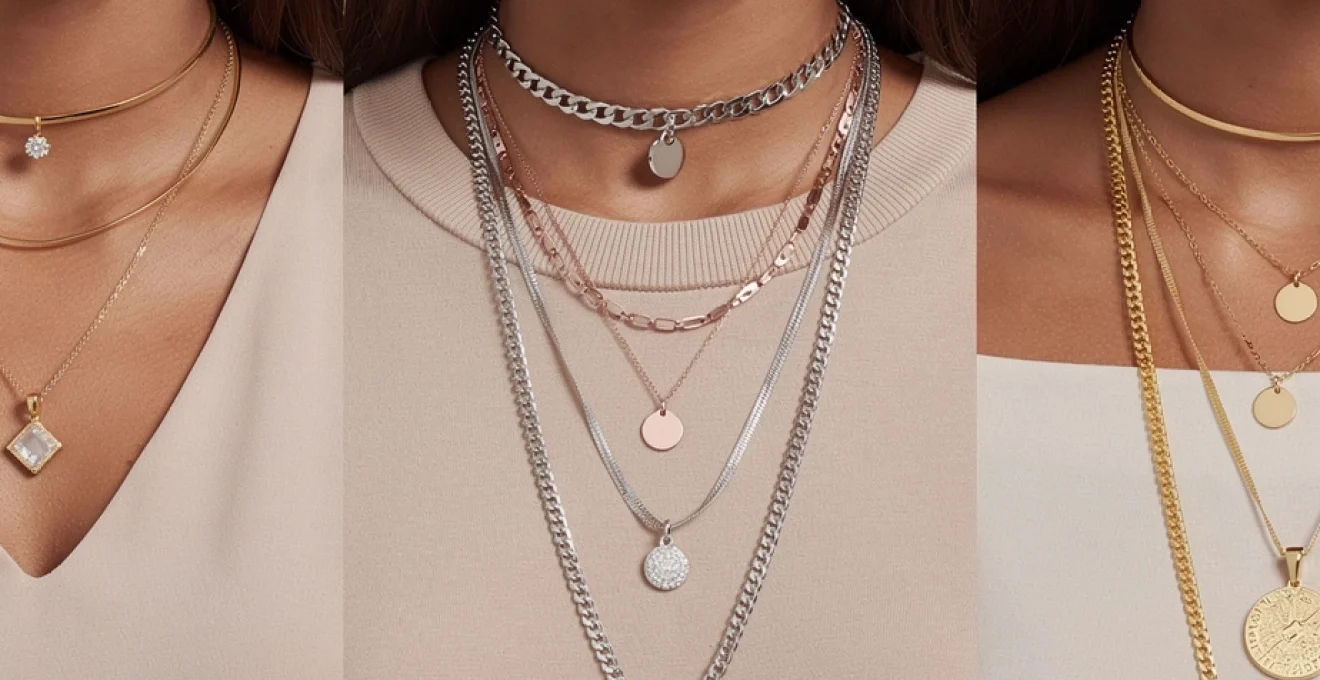
Strategic chain weight distribution and metal compatibility
Once you understand necklace lengths, the next dimension of layered necklaces to consider is chain weight and metal composition. Even the most carefully calculated length arrangement can feel off-balance if all your pieces share identical thickness or if metal tones clash rather than complement one another. Strategic weight distribution prevents heavier chains from overpowering delicate ones, whilst metal compatibility ensures your stack reads as intentional and cohesive rather than chaotic.
Think of your necklace layering like building a skyline: you want variation in height and structure, but the overall silhouette should feel harmonious. Combining different chain gauges, link styles, and metal finishes allows you to create that sense of rhythm, provided you maintain a few core points of continuity. These might be a repeating metal colour, consistent gemstone accents, or a recurring design motif that threads through multiple layers.
Balancing delicate cable chains with chunkier curb link styles
One of the most effective ways to introduce texture into necklace layering is to combine fine, delicate cable chains with more substantial curb or anchor link styles. Cable chains, with their small uniform links, provide subtle shimmer and movement, making them ideal for upper layers or supporting roles. In contrast, curb link chains feature larger, flattened links that catch more light and appear visually heavier, naturally drawing the eye.
To maintain balance between these contrasting weights, position chunkier chains slightly lower in the stack, where there is more room for them to sit comfortably without overwhelming the neckline. A typical configuration might pair a 16-inch fine cable chain with an 18-inch slightly thicker link, followed by a 20–22 inch curb chain as the grounding piece. This progression allows each chain to be seen clearly, with the heavier style anchoring the look both literally and visually.
Weight distribution also influences comfort when wearing layered necklaces for extended periods. If all your chains are substantial, the combined effect can feel tiring on the neck and shoulders, especially in warmer conditions. By mixing lighter cables with one or two statement curb chains, you achieve the perception of boldness without the physical strain—an important consideration if you intend to wear your necklace layering combinations as part of your everyday wardrobe.
Mixing gold karat variations: 14K, 18K, and vermeil coordination
Gold comes in multiple karat values and constructions, each with its own hue, hardness, and price point. When layering necklaces, coordinating 14K, 18K, and gold vermeil pieces can create a rich, nuanced palette—provided you pay attention to subtle differences in colour. Fourteen karat gold, with its higher alloy content, tends to appear slightly cooler and more subdued, while 18K gold has a deeper, warmer yellow tone. Vermeil, which consists of a thick layer of gold over sterling silver, is often colour-matched to popular karat shades but may vary between brands.
To keep layered gold necklaces cohesive, aim to cluster similar tones together or repeat a particular shade at least twice within the stack. For example, you might use a 14K gold choker and mid-layer, then introduce an 18K pendant on a longer chain as a subtle highlight. Alternatively, if your collection includes a mix of 14K and vermeil, choose pieces whose colour temperature is closely aligned—this reduces the risk of one necklace appearing unexpectedly brassy or pale next to the others.
Durability is another factor when combining karat variations. Higher-karat gold is softer and can scratch more easily, especially when in constant contact with harder alloys or plated surfaces. To preserve your most precious pieces, position them where they will experience less friction—for instance, as the shorter choker or as a pendant that hangs free of other chains. Meanwhile, vermeil and 14K gold chains, which are generally more robust, can occupy mid and lower layers where movement and contact are more frequent in your necklace layering stack.
Sterling silver and white gold pairing techniques for cohesive aesthetics
Sterling silver and white gold share a similar cool-toned appearance, making them natural companions in layered necklaces. However, there are subtle differences: white gold often has a rhodium plating that imparts a slightly brighter, whiter sheen, whereas sterling silver may develop a softer patina over time. To avoid a mismatch that feels unintentional, it helps to either lean into these contrasts or minimise them through deliberate pairing.
One effective approach is to designate one metal as the dominant base and use the other as an accent. For instance, you might build your stack with two or three sterling silver chains in varying lengths, then introduce a single white gold pendant necklace as a refined focal point. The white gold’s extra brightness becomes a highlight rather than a competing tone. Conversely, if most of your pieces are white gold, a single oxidised or antiqued sterling chain can add depth and vintage character to the overall look.
Maintenance patterns also influence how these metals perform in necklace layering. Sterling silver requires more frequent polishing to combat tarnish, especially in humid climates, while rhodium-plated white gold tends to maintain its shine longer but will eventually need replating. When combining the two, you may find that wearing them regularly actually slows tarnish on silver thanks to natural friction against the skin. That said, storing your layered set together and cleaning all pieces at the same time helps keep the tones aligned, preserving the clean, cohesive aesthetic you want from a cool-toned layered necklace stack.
Incorporating mixed metal layering: rose gold and yellow gold combinations
Mixed metal layering has shifted from style rule-breaker to modern classic, and the interplay between rose gold and yellow gold is particularly appealing. Rose gold introduces soft, blush warmth that flatters many skin tones, while traditional yellow gold provides a familiar, timeless reference point. When used together in layered necklaces, they can create a subtle ombré effect across your neckline, much like blending tones in a gradient painting.
To execute this combination successfully, consistency and repetition are key. Rather than placing a single rose gold piece amid several yellow gold chains, try to incorporate at least two rose gold elements—perhaps a choker and a pendant—so the colour feels intentional. You might start with a yellow gold base layer at 16 inches, add an 18-inch rose gold charm necklace, and finish with a 22-inch yellow gold chain that incorporates small rose gold elements in its design. This repetition of tones ties the stack together and prevents any one metal from looking out of place.
Another strategy is to introduce a bridging piece that contains both metals, such as a two-tone pendant or a chain with alternating yellow and rose gold links. This serves as a visual mediator, making it easier to add further layers in either metal without disrupting harmony. Mixed metal layering also pairs well with neutral gemstones—think white topaz, diamonds, or freshwater pearls—which act like the white space in graphic design, giving the eye a place to rest amidst the interplay of colours and textures.
Pendant selection and focal point architecture
Chain length and metal are only part of the necklace layering equation; the pendants and charms you choose determine where the viewer’s attention lands. Thoughtful focal point architecture—the deliberate arrangement of visual anchors across your layers—turns a collection of chains into a cohesive narrative. This is where you can express personal meaning through symbols, initials, or talismans, while still maintaining balance and clarity in your overall look.
Effective pendant selection in layered necklaces depends on managing scale, placement, and repetition. Too many large pendants can compete with one another, while too many tiny charms risk getting lost. By planning a graduated hierarchy of sizes and ensuring that only one or two pieces function as true “statement” elements, you create a clear path for the eye to follow from neck to décolletage.
Graduated sizing strategy: pairing small charms with larger statement pendants
A graduated sizing strategy mirrors the principle used in interior design when styling shelves: you mix larger objects with smaller ones, but you still give the biggest pieces pride of place. Applied to necklace layering, this means pairing dainty charms on the upper chains with progressively larger pendants on mid and lower layers. The result is a cascading effect where each level feels intentional, and the largest pendant naturally acts as the visual anchor.
For example, you might choose a 16-inch chain with a tiny initial charm, followed by an 18-inch necklace featuring a small disk or bar pendant, and finish with a 22-inch chain holding a more substantial medallion or gemstone drop. The eye moves smoothly from one to the next, registering each detail without confusion. This approach is especially effective if you enjoy meaningful jewellery, as it allows multiple personal symbols to coexist harmoniously in a single configuration.
When planning your sizing ladder, consider not only the physical dimensions of each pendant but also its perceived weight—an open-frame design often looks lighter than a solid plate of the same size. You can exploit this distinction to keep the overall effect airy even when your lowest pendant is relatively large. Ultimately, the goal is to establish a clear “hero” piece in your necklace layering while still giving supporting charms room to shine.
Asymmetrical pendant placement for contemporary visual interest
Symmetry is pleasing, but a touch of asymmetry can make layered necklaces feel modern and dynamic. Rather than centring every pendant perfectly at the front of your neck, you can deliberately offset one or two pieces to create a sense of movement—much like placing artwork slightly off-centre on a wall to energise a room. This technique works particularly well with delicate charms and small gemstone stations.
To experiment with asymmetrical placement, start by choosing one central focal pendant, usually on your mid or lower layer. Then, add a shorter chain with a small charm that naturally drifts to one side as you move. You might also incorporate chains with built-in side-set details, such as a tiny bezel-set stone or engraved tag positioned along the link rather than at the centre. These off-centre elements read as intentional once repeated at least twice within the stack.
The key to successful asymmetry is control. If every necklace in your layering combination is sliding unpredictably, the result can look messy rather than artful. Using a layering clasp or adjusting clasp positions at the back of your neck (so they do not align) helps keep certain pieces anchored while allowing selected pendants to wander slightly. The outcome is a look that feels relaxed and contemporary, without sacrificing polish.
Gemstone and diamond accent coordination across multiple layers
Gemstones and diamond accents introduce colour, brilliance, and symbolic value to layered necklaces, but they also require careful coordination. A stack that combines too many unrelated hues can quickly feel busy, whereas a considered palette creates coherence and sophistication. One reliable strategy is to choose a primary gemstone colour—such as deep blue sapphire, soft green peridot, or classic clear diamond—and repeat it in different sizes or settings across your layers.
For instance, you might wear a choker with tiny diamond stations, an 18-inch chain with a single coloured gemstone pendant, and a longer necklace that alternates the same gemstone with diamond accents. This repetition builds a visual language within your stack, akin to recurring motifs in a well-composed piece of music. If you prefer more variety, you can still maintain order by sticking to a tight colour family—think varying shades of blue stones—or by treating neutral diamonds and white topaz as “connective tissue” between more vibrant pieces.
Practicality matters as well. Harder gemstones like diamonds, sapphires, and rubies are generally better suited to lower layers, where they may bump against clothing or other chains, while softer stones such as opals or turquoise benefit from being placed higher up and closer to the skin. By considering both aesthetics and durability when arranging gemstone pieces in your necklace layering, you ensure that your stack is as wearable as it is beautiful.
Neckline-specific layering configurations
No matter how well-curated your necklace collection, the success of any layered look ultimately depends on how it interacts with your clothing. Different necklines frame your jewellery in distinct ways, either offering ample space for chains to drape or constraining them to a narrow window of visibility. Understanding how to adapt your necklace layering to V-necks, crew necks, and strapless styles ensures that your pieces enhance your outfit rather than competing with it.
Think of your neckline as the stage and your necklaces as the performers. A wide, open stage can accommodate multiple “actors” of varying heights, while a smaller aperture calls for a more tightly edited cast. By matching the shape and depth of your layers to the outline of your top or dress, you create harmony between fabric and metal that looks deliberately styled rather than improvised at the last minute.
V-neck and plunging neckline: triangular chain arrangement methods
V-neck and plunging necklines naturally create a triangular frame that draws attention to the centre of the chest, making them perfect partners for layered necklaces that echo this shape. The most effective configurations use a descending sequence of lengths that trace the V without crossing awkwardly over fabric edges. A typical triangular arrangement might start with a 16-inch choker, followed by an 18-inch pendant that lands just above the V’s point, and finish with a 20–22 inch chain that mirrors the neckline’s angle.
When working with deeper plunges, you have the opportunity to extend your focal pendant lower, perhaps at matinee length, to occupy the exposed space in a way that feels elegant rather than bare. In this case, keeping upper layers relatively minimal prevents the look from becoming overly busy. A simple close-fitting chain at the base of the neck combined with one dramatic lariat or Y-shaped necklace can be particularly striking, as the vertical line of the drop complements the downward sweep of the neckline.
One practical tip: ensure that the lowest point of your pendant does not constantly catch on the fabric edge of the V, as this can cause both tangling and premature wear. Adjusting chain lengths by even half an inch with extenders can make a significant difference. By aligning the endpoints of your necklace layering with the geometry of your neckline, you achieve a visually satisfying and comfortable result.
Crew neck and high collar styling: shorter chain cluster techniques
Crew necks, turtlenecks, and other high collar styles provide a solid backdrop for layered necklaces, but they also limit how low your chains can fall before disappearing under fabric. In these cases, it is usually best to concentrate your layers above or just at the collar line, creating a cluster of shorter chains that reads almost like a modern, deconstructed collar necklace. This approach emphasises texture and metal rather than length.
A classic method is to build a tight stack of two or three chains between 14 and 18 inches, varying both thickness and link style. For example, you might pair a 14-inch snake chain with a 16-inch paperclip link and an 18-inch delicate pendant, all sitting comfortably atop a crew-neck knit. Because the neckline provides a clear horizontal boundary, the visual interest comes from how these chains interact with one another, so mixing finishes—matte and polished, rounded and angular—can add depth.
High collars also invite bolder statements, such as a single chunky chain worn over a fine-gauge turtleneck or the addition of a rope-length necklace layered on top of a sweater. In these cases, you are effectively treating the fabric as part of the composition, using it to frame or contrast with your jewellery. The main consideration is proportion: if your top is already voluminous or features dramatic details at the neck, keeping your necklace layering streamlined ensures the overall look remains balanced and wearable.
Off-shoulder and strapless garments: optimal length combinations
Off-shoulder and strapless garments create a broad expanse of exposed skin across the collarbones and upper chest—a perfect canvas for more expressive necklace layering. Here, you are not constrained by fabric edges, so you can play with both shorter chokers that hug the neck and longer pendants that draw the eye downwards. The challenge is choosing lengths that enhance your natural lines without overwhelming the openness of the neckline.
A refined option is to pair a close-fitting choker at 14–15 inches with an 18-inch mid-layer and a 20–22 inch pendant that lands just above the top of the bodice. This triple-layer arrangement forms a gentle curve that echoes the shape of the shoulders. If your style leans more minimal, you might instead opt for a single sculptural choker or a duo of chains with a clear length difference, allowing negative space between them to act as part of the design.
Because strapless necklines already make a strong visual statement, consider the overall occasion when deciding how maximal to go. For daytime events, lighter chains and smaller pendants tend to feel more effortless, while evening or formal occasions can handle bolder pieces, gemstones, and mixed metals. In every case, check the balance between your necklaces and earrings; if your layered necklaces are particularly intricate, simpler studs or small hoops usually provide the most harmonious finish.
Advanced layering techniques for chain separation and tangling prevention
Even the most beautifully composed necklace layering loses its appeal if the chains constantly knot together. Tangling is one of the primary frustrations people face when experimenting with layered necklaces, but it is not inevitable. With a few advanced techniques and the right hardware, you can dramatically reduce the likelihood of twists, knots, and uneven draping, even when wearing multiple chains for hours at a time.
At the heart of tangle prevention is separation—both in terms of physical spacing and in the way your chains move relative to one another. By combining varied textures, using specialised clasps, and paying attention to how each necklace is fastened, you create an environment where chains are less likely to interlock. The result is a layered look that stays as polished at the end of the day as it was when you first put it on.
Necklace spacer clasps and detangler mechanisms
Necklace spacer clasps—often called layering clasps or detanglers—are among the most effective tools for maintaining chain separation. These devices typically consist of two parallel bars or disks with multiple attachment points, allowing you to clip each necklace to its own ring while securing everything with a single main clasp. Because the chains are anchored at fixed distances from one another, they are less likely to twist together at the back of your neck.
Using a spacer clasp also simplifies the process of putting on and taking off layered necklaces. Instead of fastening three or four individual clasps, you handle just one mechanism, which is particularly helpful if you have limited dexterity or are working with finer chains. When shopping for a detangler, look for models that match the metal tone of your jewellery and include secure closures, such as lobster or slide locks, to prevent accidental opening during wear.
For optimal results, attach your shortest necklace to the top ring of the spacer and work downward in order of length. This arrangement preserves the natural cascade of your layers while keeping each chain in its designated lane. While no solution can eliminate tangling entirely—especially with very fine or similar-length chains—a quality spacer clasp can significantly improve the day-to-day wearability of complex necklace layering combinations.
Varying chain textures: combining box, snake, and figaro link patterns
Chain texture plays a surprisingly important role in tangle prevention. When all your necklaces share the same fine link type, they can behave almost like threads, easily twisting and knotting around one another. Introducing variety—such as pairing a silky snake chain with a structured box chain and a classic Figaro link—creates subtle friction differences that help each chain move independently rather than as a single tangled unit.
Snake chains, with their smooth, almost tubular construction, glide nicely against the skin and are less prone to catching on other links, making them ideal for upper or lower layers that you want to move freely. Box chains, built from square links, offer a more architectural profile and hold their shape well, providing stability in the middle of a stack. Figaro chains, which alternate short and long links, add visual rhythm and tend to lay flat, reducing the risk of bunching.
When planning a multi-textured stack, imagine how each chain will behave in motion. A practical method is to test combinations by gently lifting and lowering them together in your hand; if two chains immediately twist into one another, consider substituting one for a different link style. Over time, you will develop an intuitive sense of which textures play well together, making it easier to build tangle-resistant necklace layering combinations.
Strategic clasp placement and adjustable extender chain integration
Clasp placement is a subtle but powerful factor in how your layered necklaces sit and move. If every clasp rests at the exact centre of the back of your neck, the weight concentrates at a single point, encouraging chains to rotate and cross. Instead, you can stagger clasps slightly along the neckline—one slightly to the left, one to the right, and one central—so each chain has its own path. This small adjustment helps maintain separation throughout the day.
Adjustable extender chains are equally valuable for refining both length and comfort. Many necklaces now include built-in extenders, typically offering 2–4 inches of flexibility, allowing you to shift a chain just enough to clear another layer or sit more harmoniously with a specific neckline. If your favourite pieces lack this feature, you can purchase separate extenders in matching metals and attach them as needed, effectively turning a fixed-length necklace into a versatile layering component.
From a practical standpoint, it is worth noting that even half an inch of additional length can prevent clasps and pendants from colliding. When building your go-to layered combinations, take a moment to note which extender lengths work best with particular outfits. Over time, you will create a mental (or written) reference of reliable measurements, streamlining future styling sessions and keeping your necklace layering both beautiful and functional.
Contemporary layering formulas and style frameworks
While creativity is at the heart of necklace layering, having a few reliable formulas can make everyday styling quicker and less overwhelming. Think of these frameworks as blueprints: they give you a structure within which you can swap pieces in and out, depending on your mood, outfit, or occasion. Once you have mastered a handful of these configurations, you can build them almost on autopilot, confident that the underlying proportions will work.
These formulas range from the understated to the editorial, accommodating everything from minimalist aesthetics to high-impact fashion looks. You do not need a vast jewellery collection to use them effectively; in fact, many people find that three to five well-chosen chains can be recombined in a surprising number of ways. The key is to understand what role each piece plays within the structure of your necklace layering and to adjust only one or two variables at a time.
The classic three-layer configuration: short, medium, and long ratio
The three-layer stack is perhaps the most versatile and widely used necklace layering formula. It relies on a simple ratio: one short chain at or near the base of the neck, one medium-length piece at the collarbone, and one longer chain that falls just below. This “short–medium–long” progression creates clear separation between layers and works well with most necklines, from crew necks to gentle V-shapes.
A typical example might include a 15–16 inch choker, an 18-inch pendant necklace, and a 20–22 inch chain with or without an additional charm. By varying textures—say, a fine cable for the shortest layer, a stone-accented chain at mid-length, and a slightly chunkier link at the bottom—you introduce depth without losing coherence. This arrangement is an excellent starting point if you are new to layering necklaces, as it offers structure while leaving ample room for personalisation.
To adapt the classic three-layer configuration for different occasions, you can simply switch out one element. For a more formal look, make the longest chain your statement piece with a bolder pendant or gemstone. For casual outfits, keep all three layers delicate and let subtle differences in shine and texture do the work. Over time, you may find that this ratio becomes your default, with variations that reflect your evolving style.
Maximalist five-plus layer stacking for editorial fashion impact
For those who love making a strong visual statement, maximalist stacking with five or more layers offers a playground of possibilities. This approach is less about strict rules and more about controlled abundance—much like curating a gallery wall where each artwork has its own space yet contributes to a larger story. The challenge is to avoid visual overload while embracing richness and variety.
To keep a five-plus necklace layering configuration wearable, start by establishing a stable base of two or three chains that you know work well together in terms of length and texture. Then, gradually add supplementary layers in the gaps, paying attention to both vertical spacing and weight distribution. You might combine a mix of chokers, mid-length pendants, and one dramatic long chain, alternating between metal-only pieces and those featuring gemstones, pearls, or charms.
Colour and motif repetition become especially important in maximalist stacks. Perhaps you echo a specific symbol—such as stars, hearts, or coins—across several layers, or you limit your gemstone palette to one or two hues. This repetition acts like a visual through-line, ensuring that the stack feels intentional rather than random. Because these looks naturally demand attention, they tend to pair best with simpler clothing silhouettes and more restrained earrings and bracelets, allowing your necklace layering to take centre stage.
Minimalist two-chain layering: proportional spacing and negative space utilisation
At the opposite end of the spectrum, minimalist two-chain layering proves that you do not need many pieces to achieve a polished effect. In this framework, every choice becomes more visible, so proportion and negative space play critical roles. The goal is to create a dialogue between the two necklaces—a relationship where each enhances the other rather than competing for attention.
A widely flattering approach is to combine a shorter, closer-fitting chain at 15–16 inches with a longer pendant at 18–20 inches, leaving a noticeable but not excessive gap between them. This spacing allows each necklace to read clearly while the open area of skin in between acts almost like a deliberate design element, highlighting the lines of your neck and collarbones. To keep the look cohesive, you might repeat a subtle motif, such as matching finishes or complementary geometric shapes.
Minimalist layering is particularly suited to everyday wear and professional environments, where you may want your jewellery to feel refined but not overpowering. It also provides an excellent foundation for gradual experimentation; you can always add a third chain on days when you crave a little more drama. By mastering the art of doing more with less, you ensure that your necklace layering remains adaptable, timeless, and uniquely attuned to your personal style.